About the project
The following project explains how I used a Raspberry Pi 4 to create a personal digital video recorder to record over-the-air tv.
Required Hardware
This project requires the following hardware:
- Raspberry Pi 4 (with the required parts)
- 4GB of ram
- A 16GB SD card
- A micro HDMI cable
- Monitor with HDMI input
- A 15.3W USB-C Power Supply (3A @ 5v power supply)
- Raspberry Pi 4 case. Preferably a passive cooling case for noise consideration.
I used the Argon One case.
- An HDHomeRun Dual tuner from Silicondust. The oldest model will do. For this build, I used the HDHR3-US which dates back to 2012-2013.
- An over-the-air tv antenna for ATSC signals. For this build I use the Clearstream 4 antenna by Antennas Direct.
- 50ft to 100ft Coaxial Cable, 18AWG, 75 Ohm to connect the antenna to the HDHomeRun.
- External Solid State Drive (SSD) with about 500Gb in size.
- USB 3.0 to SATA Converter Adapter – Look for one that has UASP support.
Software list
This section defines the list of required software for the project. Follow the instructions in the next section to know when and how to install them.
- Download Raspberry Pi OS with desktop and recommended software from https://www.raspberrypi.org/software/operating-systems/
- Download the Raspberry Pi Imager to write the Raspberry Pi OS image to an SD card.
Instructions
Write Raspberry Pi OS image file to your SD card
- Launch the Raspberry Pi Imager for writing the Raspberry Pi OS image file to your SD card. There are plenty of online tutorial for this operation
- Turn on the Raspberry Pi and follow “first launch” instructions on screen.
Update the Raspberry Pi firmware
The oldest Raspberry Pi 4 models that originally shipped uses an out of date firmware. Most of all, they do not support booting from an SSD drive connected through USB. Updating the firmware provides better thermals and USB boot support.
Jeff Geerling has written an excellent guide on how to upgrade the Raspberry Pi 4’s firmware.
Follow his instructions available at:
https://www.jeffgeerling.com/blog/2019/upgrade-raspberry-pi-4s-firmware-bootloader-better-thermals.
In summary, run the following commands in a terminal:
|
1 2 3 4 5 |
sudo apt update sudo apt -y full-upgrade sudo apt install -y rpi-eeprom sudo rpi-eeprom-update sudo reboot |
Check that USB 3.0 to SATA adaptor has UASP support
UASP stands for USB Attached SCSI Protocol. In very few words, it is a protocol used in USB storage devices and adapters that performs better that the traditional USB 1.1 protocol.
Jeff Geerling has written an excellent guide on how to verify if your adaptor is UASP compatible.
Follow his instructions available at:
https://www.jeffgeerling.com/blog/2020/uasp-makes-raspberry-pi-4-disk-io-50-faster.
In summary, connect your ssd drive and run the following commands in a terminal:
|
1 |
lsusb -t |
From Jeff Geerling article:
This command lists all the USB devices in a tree, and for each of the hard drives, you should see a Driver listed. If it’s uas , then your drive supports UASP and you’ll get the best speed. If it’s usb-storage , then it’s using the older BOT protocol and you won’t see the full potential.
Enable USB boot on the Raspberry Pi
A USB 3.0 Flash Drive or an USB 3.0 SSD is almost always preferable to an SD Card when booting the Raspberry Pi OS. The thing about booting Operating Systems is that 4K Read/Write Speed dictate the experience more than the sequential Read/Write Speed (the usual advertised speed). SD card usually have bad performance regarding 4K Read/Write speed.
On the Raspberry Pi4, you can specify whether to boot from USB or network if the SD card isn’t inserted.
The raspi-config utility can enable USB Booting on the Raspberry Pi 4:
- Launch the application in a terminal.
- Enter Advanced Options section.
- Enter Boot Order section.
- Select USB Boot option.
See raspi-config.md documentation and bcm2711_bootloader_config.md documentation on https://www.raspberrypi.org/ for more details.
Move Raspberry Pi OS from SD card to SSD drive
Running the Raspberry Pi 4 on an SD card has great read and write speed. Opening an application feels good and we do not have to wait forever to get us going. However, an SD card cannot sustain the passage of time. Our build requires to run the raspberry pi 24/7. Sooner or later the SD card will get corrupted during a write operation and then our precious setup we created won’t be able to boot from the card anymore.
One solution is to moving the root file system of your Raspberry PI to an external USB drive bypasses this problem. This article presents instructions on moving the root file system from the SD card to an external USB drive, such that you can boot your Raspberry PI with the root file system on the USB drive.
The SD Card Copier application, which can be found on the Accessories menu of the Raspberry Pi Desktop, will copy Raspberry Pi OS from your SD card to your SSD drive. To use it, you will need to have the USB drive already connected before launching the application.
Follow the following instruction for moving the Raspberry Pi OS from SD card to SSD drive:
- Connect the SSD drive to a USB 3.0 port on the Raspberry Pi.
- Launch the SD Card Copier application, which can be found on the Accessories menu of the Raspberry Pi Desktop.
- Select your SD card device in the Copy From Device dropbown. It should probably be labeled /dev/mmcblk0.
- Select your SSD device in the Copy To Device dropbown. It should probably be labeled /dev/sda.
- Click on Start button.
- Wait for the process to complete.
- Close the application.
Shrink the Operating System partition
Following the copy of the Raspberry Pi OS from the SD card to the SSD, the SD Card Copier application has automatically increased the size of the last partition to the total size of the SSD. This is a problem for the following reasons:
- If we have a single huge partition, we are not able to backup the operating system on our disk. This is because a backup destination image cannot be stored on the same partition that it is backuping from. We need at least 2 partitions to backup the operating system to the same disk.
- To allow quick backup of the operating system, we need the partition to be reasonably small. On a 16GB card, the operating system partition is 14.58 GB of which about half is in use. This gives us plenty of additional space if we need to install other software.
- For our build, we want to store our tv recordings and the operating system on different partitions. TV recordings should be stored in the largest partition of the disk.
- In many cases, it is better to store operational data (in our case: recordings, backups, etc) on a separate partition (other than the OS). This configuration allows to restore the OS from a backup or install a fresh new operating system without having to erase the operational data. In other words, we get to keep our recordings in case of an OS corruption or a boot failure.
The following instructions explains how to reduce the size of the OS partition:
- Open GParted.
- Switch to the SSD device (probably /dev/sda)
- Select the last partition. This is the partition of the Operating System.
- Resize the partition to the original size of the SD card.
- Create a partition for the remaining space of the SSD.
Format the partition as ext4. This is to make sure we get the best read and write performance.
For reference, the Rraspberry Pi 4 is capable of the following writing speeds:- 85 mb/s to an external usb 3.0 SSD with an ext4 partition.
- 26 mb/s to an external usb 3.0 SSD with an NTFS partition.
- Set the name of the partition to pidvr.
Boot from the SSD drive
At this point, our SSD is now properly configured to be used as our boot device.
Follow these instructions to boot from the SSD:
- Shutdown the device
- Disconnect the power cable.
- Remove the SD card from the SD card slot.
- Connect the power cable to the Raspberry Pi.
Uninstall nonessential software
Since we installed the Raspberry Pi OS with desktop and recommended software image, there are multiple software that are shipped with the image that we do not intend to use. Most importantly, some of them uses a lot of disk space.
Uninstall the following unneeded software:
- Open Recommended Software manager, which can be found in Preferences menu.
- Uncheck the following software
- In Education, uncheck SmartSim
- In Games, uncheck them all
- In Programming, Uncheck Mathematica, Scratch, Scratch 3, Sense HAT emulator, Sonic Pi
- Click Apply button to uninstall
Install additional software
To allow management of the PiDVR, we will need to install other software.
Argon One fan script
This is specific to our build since we are using the Argon One case. The instructions from http://wagnerstechtalk.com/argonone/ properly explains how to install the scripts to support the Argon One power button and fan speed.
In summary, run the following commands in a terminal:
|
1 |
curl https://download.argon40.com/argon1.sh | bash |
Other
The following list of programs can be installed manually in the terminal:
- hdparm, to perform read and write performance tests
- GNOME Disks, to get information about disks and partitions
- GNOME Partition Editor (gparted), to resize and format partions.
- GSmartControl, to get SMART information about our disks.
- QDirStat, to calculate disk usage per directories.
- 7-zip, to add support for *.7z archives in Archiver software.
The following instructions can install all software mentioned above:
|
1 2 |
sudo apt-get update sudo apt-get install hdparm gnome-disk-utility gparted gsmartcontrol qdirstat p7zip-full |
Create storage directories for our recordings
The instructions in this section explains how to create our base storage directories.
As discussed above, we want tv recordings to be stored on the SSD in the pidvr partition which is automatically mounted at /media/pi/pidvr.
In directory /media/pi/pidvr, create the following directories:
- backup, for storing backup images of the raspberry pi os
- recordings, for storing our recordings, obviously
- shared, for creating a Windows shared directory for easily transferring files from/to the raspberry pi. See next section below.
By default, these directories will only be writable (or accessible) for the pi user on the Raspberry Pi. This is a problem for our build since tvheadend run as hts user and hts user won’t have access by default to our recordings directory. To allow anyone to have read and write access to these directories, enter the following command in a terminal:
|
1 |
sudo chmod -R 7777 /media/pi. |
Note: by default, a partition permissions are inherited from its parent directory where the partition is mounted. In this case, the partition mounted at /media/pi/pidvr inherits the permissions from /media/pi directory.
A reboot of the Raspberry Pi may be required for the new partition is show up as writable for everyone.
Install Samba SMB/CIFS support
By default, Raspberry Pi OS does not include CIFS/Samba support, but this can easily be added. The Raspberry Pi documentation has an article available at https://www.raspberrypi.org/documentation/remote-access/samba.md that explains how to proceed.
In summary, run the following commands in a terminal:
|
1 2 |
sudo apt update sudo apt install -y samba samba-common-bin smbclient cifs-utils |
Note: During installation, if you have other samba servers on your network, choose no which is the default option.
To create shared directories that can be accessed by a Windows computer, edit the configuration file /etc/samba/smb.conf with the following command:
|
1 |
sudo nano /etc/samba/smb.conf |
and add the following new sections:
|
1 2 3 4 5 6 7 8 9 10 11 12 13 14 15 16 17 18 |
# Create a read-only shared directory called 'recordings' to # easily export recording files outside of the raspberry pi. [recordings] comment = DVR recordings path = /media/pi/pidvr/recordings force user = pi public = yes writable = no # Create a read ans write shared directory called 'shared' to # easily transferring files from/to the raspberry pi. [shared] path = /media/pi/pidvr/shared force user = pi public = yes writable = yes create mask = 0777 directory mask = 0777 |
Restart the samba daemon service for the changes to take effect:
|
1 |
sudo systemctl restart smbd |
Run Raspberry Pi Configuration utility
The default configuration of the pi should be properly set for most users. For our usage, we need to change some of the configuration settings.
For example, the default hostname for the raspberry pi is raspberrypi which is a problem if you own multiple raspberry pies because the hostname of a device on a network must be unique for every device in order to be reachable by others. It is also good practice to change the hostname to something that represent the intended usage of the pi.
The Raspberry Pi Configuration application, which can be found on the Preferences menu of the Raspberry Pi Desktop, will allow you to change the required settings. Please change the following settings accordingly:
- In System tab, change the hostname to pidvr.
- In Interfaces tab, enable SSH and VNC.
Install Tvheadend
This is the main software for the build. You can find more information about tvheadend at https://tvheadend.org/.
There are already great guides that explains how to install and configure tvheadend. For example, thepihut and pimylifeup have great instruction guides.
In summary, run the following commands in a terminal to install tvheadend:
|
1 2 |
sudo apt update sudo apt install -y tvheadend |
Note: During installation, you will need to provide a username and password for the tvheadend aministrator. You can use pidvr and pidvr.
Tvheadend initial configuration setup
After installation, connect to the tvheadend web interface to configure the application and scan for channels. Head over to the following address:
http://pidvr:9981/
Welcome (1 of 2)
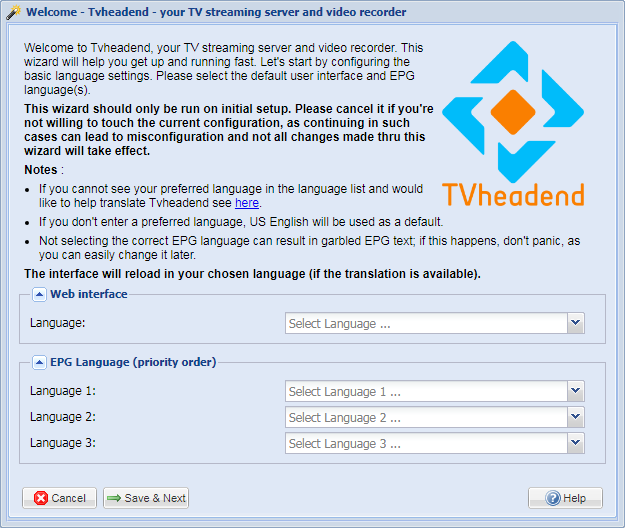
tvheadend – welcome page (1 or 2)
 This first screen will require you to select a language the web interface and the electronic program guide (EPG):
Enter the following values:
- English
- French
Click Save & Next to get to the next page.
Note: Since we actually changed the language of the web interface, the same page may be displayed when you first click Save & Next. Click it again.
Welcome (2 of 2)


tvheadend – welcome page (2 or 2)
The next page allows you to configure the network access.
We are going to allow all network access by leaving the ‘Allowed network’ field blank.
We are also going to bypass any logins by entering * in each of those fields.
Click Save & Next to get to the next page.
Network settings
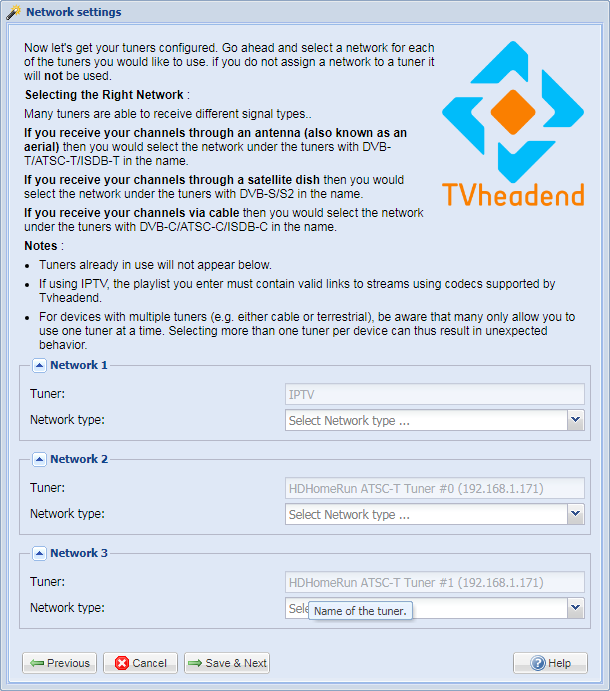
tvheadend – network settings
 The next screen configures the tuners.
Leave the IPTV fields from Network 1 blank.
At this point, tbheadend should have already discovered both HDHomeRun ATSC-T Tuner #0 and #1 identified in “Network 2” and “Network 3” sections. Select ATSC-T Network in the Network type fields for each network.
Click Save & Next to get to the next page.
Assign predefined muxes to networks
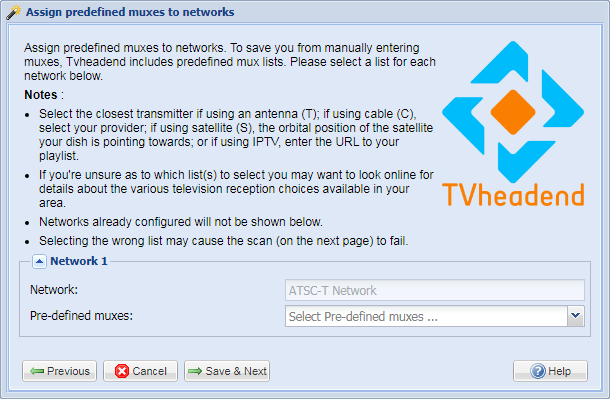
tvheadend – muxes
We now have to set the “muxes”. To save you from manually entering muxes, Tvheadend includes predefined mux lists. For best results in Montreal area, select the following muxes: United States: us-ATSC-center-frequencies-8VSB
Click Save & Next to get to the next page.
Scan status
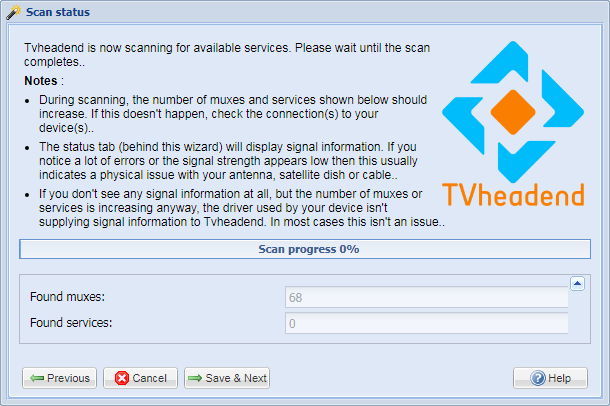
tvheadend – scan status
The scan will now commence. It will search for “muxes” and “services” that are distributed via those muxes. Note, a service is a TV channel. When the scan hits 100% you’ll be able to see how many muxes and services it’s picked up.
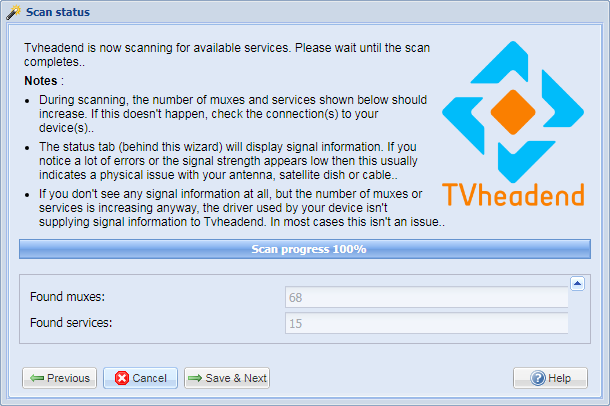
tvheadend – scan status (100% completed)
Click Save & Next to get to the next page
Service mapping
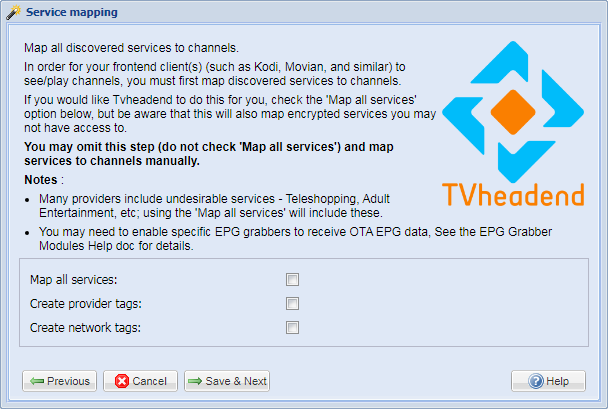
tvheadend – service mapping
Next on the wizard is service mapping. This step maps the services that your scan discovered to channels. If you are interested in adding all channels in your area, do not tick any checkbox. Otherwise, tick the three check boxes.
Click Save & Next to get to the next page.
Finished
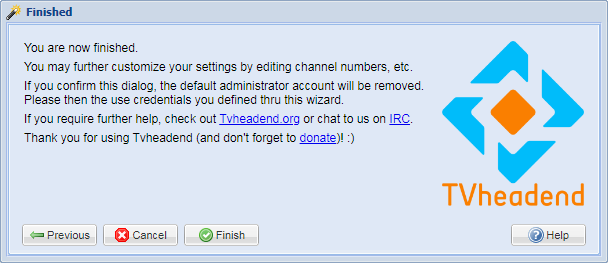
tvheadend – setup finished
The initial setup is finished. Click Finish to complete the
At this stage we like to reboot the Raspberry Pi. In the terminal use the following command to restart your Raspberry Pi:
|
1 |
sudo reboot now |
Tvheadend additional configuration
The following list are specific configuration settings that I like to set for tvheadend:
Set web interface level to Advanced by default
- Go to Configuration, General, Base tab.
- Set User interface level to value Advanced.
- Click on Save when done.
Test for tvheadend has access to ‘recordings’ directory
tvheadend runs as user hts. To test read and write access from hts user perspective, type the following in a terminal:
|
1 2 3 4 |
sudo su hts cd /media/pi/pidvr/recordings touch hts_test_file rm hts_test_file |
The commands specified above should not output any error like the following:
|
1 |
touch: cannot touch 'hts_test_file': Permission denied |
Setup preferred recordings settings
- Go to Configuration, Recording, Digital Video Recorder Profiles tab.
- Click on the Default profile.
- Set Recording system path to value /media/pi/pidvr/recordings.
- Set Pre-recording padding to 1 min.
- Set Post-recording padding to 3 min.
- Uncheck Skip commercials options.
- Check Include date in filename, Include time in filename and Use Windows-compatible filenames options.
- Click on Save when done.
Enable Timeshift
Timeshift is disabled by default and needs to be enabled to get the maximum out of tvheadend.
- Go to Configuration, Recording, Timeshift tab.
- Switch to Expert mode. This is to work around a bug explained here and here.
- Check enabled.
- Set Storage path to value /media/pi/pidvr/recordings.
- Set Maximum size (MB) to value 4096.
- Check On-demand (no first rewind) and Fit to RAM (cut rewind).
- Click on Save when done.
Set Network Character set
Montreal channels have the EPG encoding using UTF-8. The network character encoding must be specified manually.
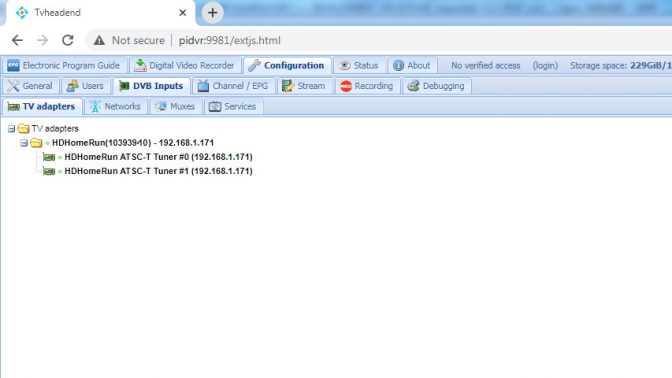
- Go to Configuration, DVB Inputs, Networks tab.
- Select the default network created by the first scan (named ATSC-T Network).
- Click edit button.
- Change the name of the network (i.e. My ATSC Network)
- Set Character set to value UTF-8.
- Click on Save.
Switch to Muxes tab.- Select all available muxes: click on the first mux and press CTRL+A.
- Click edit button.
- Check Character set in Advanced Settings.
- Set Character set to value UTF-8.
- Click on Save.
Switch to Services tab.- Select all available services: click on the first service and press CTRL+A.
- Click edit button.
- Switch to Export view level.
- Check Character set in Advanced Settings.
- Set Character set to value UTF-8.
- Click on Save.
Map desired services as channels
If you did not mapped all services as channels during first configuration, now is the time to do it.
For Montreal area, here is the list of French channels:
- Radio-Canada CBFT-DT
- TVA CFTM-DT
- Noovo CFJP-DT
- Télé-Québec CJNT
- Go to Configuration, DVB Inputs, Services tab.
- Select all available services: click on the first service and press CTRL+A.
- Click edit button.
- Check Enabled setting in Basic Settings and uncheck the value.
- Click on Save.
- Check only the your desired channels that you want to map
- Click on Save.
- Click on Map Selected then Map selected services, a new window will open
- Uncheck Create type-based tags.
- Click on Map sercices.
- Wait for the mapping process to end.
Change channel identifiers to meaningful names
This is for changing the name of the channels from CBFT (or something) to the actual name of the tv network that owns these channels.
- Go to Configuration, Channel / EPG, Channels tab.
- Double click the name of each channel that you need to rename
- Click on Save when done.
For example:
- Radio-Canada – CBFT-DT
- TVA – CFTM-DT
- Noovo – CFJP-DT
- Télé-Québec – CJNT
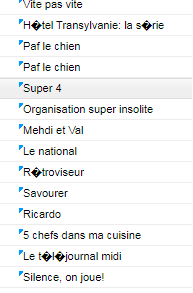
UTF-8 characters in Electronic Program Guide (EPG) – bug
 The tv guide seems to be still using non-utf8 characters. This is still an open issue and I have not yet figured out a way to solve the issue:
Configure Kodi to connect to tvheadend
The following instructions defines how to connect Kodi with tvheadend to view recordings:
Install tvheadend add-on
- Open Kodi.
- Go to Settings.
- Select Add-ons.
- Select Install from repository.
- Select PVR Clients category.
- Select Tvheadend HTSP Client.
- Select Install and wait for the add-on to install.
- Select Tvheadend HTSP Client (again).
- Select Configure.
- Set tvheadend hostname to pidvr.
- Click on OK when done.