Introduction
Shooting a waterfall with a DSLR camera is not that hard. As usual in photography, you need a lot a patience. The perfect picture is all about managing a long exposure of the waterfall. This will get you a nice look as if the waterfall would be a silk river. In this guide, I will explain how I managed to get this picture of the “Chute du Diable”.
Context
During summer 2014, I went camping with my family to Mont-Tremblant and as always, I have brought my camera with me. I was lucky enough to bring all my camera gears since I was not expecting that I would have to use almost all of them to get a nice picture of a waterfall.
The “Chute du Diable” is located in Canada, Québec, Mont-Tremblant which is around 2 hours North of Montreal. If you still don’t know where it is, here is the precise location where I got this shot:
Latitude: 46.3828892
Longitude: -74.4716262
Required gears
As I said, getting a nice picture of a waterfall is not that hard. However, you must be prepared because you will need to have the right filters and you must be able to navigate your way in your camera menus to detect overexposed areas.
Here is the equipment that I had to bring with me for taking a good picture of a waterfall:
Tripod and remote trigger
Since we will take long exposure pictures, we need to be properly stabilized and a way to release the shutter without moving the camera. A wireless remote trigger would be perfect but I managed to get a nice picture with a wired remote trigger.
Filters
The most important (mandatory) of all piece of equipment for shooting a waterfall is ND filters. Without these filters, you will not be able to take a long exposure shot without overexposing the final image.
Optionally, you can use a CPL filter to minimize reflections and bright spots in your image.
Lens cleanup cloth
You are actually trying to shoot water falling from a high point. There will be a constant water mist in the air! Your lens may get wet while you are preparing yourself so you need to have a cloth for cleaning it up before taking your shot.
How to shoot a waterfall with a DSLR camera
Find your best point of view
Take your time to “read” the area. Is it better from a high point of view or a lower point of view ?
Consider the fact that there might be time that are too windy (which would result in blurred leaves in trees) so you might need to find a spot where you do not see too much leaves or at least find a spot where they are not too close to the camera.
Find a point of view that do not show too much water or too much rocks since you may have difficulties finding the correct exposure dealing with the dark rocks and bright foamy water.
Once you have found your perfect spot, secure your camera on your tripod and head to the next step.
Setup manual mode
Switch your camera in manual mode and set the ISO to 100 to reduce the noise on the sensor. You will have plenty of light coming through your lens!
Note: You may also want to set your camera to shoot in RAW mode to adjust your final pictures. On sunny days, there is sometimes too much light to properly see the result picture on the preview screen. You might think that your exposure is correct when it’s not. Shooting in RAW mode would allow you to correct this issue without scarifying too much of image quality.
For your shot, you want to get the maximum area of the picture to be in focus. The static part of the picture (Trees, plants and flowers around the waterfall) has to be in focus to get a good contrast from the movement of the water. An aperture of f16 or higher would be a good start to get a nice depth of field. To get this thumbnail picture, I have set the aperture to f22.
The perfect silk waterfall effect is achieved with a long exposure of 1 to 3 seconds depending on how fast the water is moving. Set your shutter speed to 1.5 seconds to get an average look.
Add required filters
Do not waste your time taking a shot right now since all you will get is an overexposed image. You need to add filters! This process is simple, add filter until you get the a picture that don’t have overexposed areas.
A good start is to use an ND8 filter. To get this shot, I first installed an ND4 filter on my lens but that wasn’t enough. I had many areas in the picture that were overexposed. I then added an ND2 filter. I know, I could have used an ND8 which is identical to ND2+ND4 and I agree that it would have been better. However, since I was with my family, I didn’t had much time to try multiple combinations. I also wasn’t expecting to have to go as high as ND8.
The last filter you can add is a CPL filter. This one is optional but I used one to get the picture above. You install this filter on top of all other filters. No other filters or camera mount must be over a CPL filter because it is a rotating filter so you do not want to change your setup by screwing another filter on top! Look through your viewfinder and rotate the filter until you get the appropriate effect.
Take your shot
Now is the time to take your shot. Adjust the shutter speed to get the water effect you want to achieve and finally adjust the aperture to get the right exposure. Do not hesitate to get multiple shots at multiple shutter speed. Sometime the smallest change in exposure time can create a different water pattern.
Most important of all, do not forget to enjoy what you are doing!
Post processing
Correcting underexposed trees and rocks
After the capturing process, you may find your pictures are correctly exposed for the waterfall but all the vegetation and rocks around it might be underexposed. To correct this issue, you need to make a manual exposition correction in order to darken highly exposed areas while lightening underexposed areas. This is why it is important to shoot in RAW. The correction can be done with Lightroom easily.
If you do not have access to a copy of Lightroom, you can do the same effect (almost) with free tools. The same effect can be achieved by applying a “Contrast Mask” on the image using the free image editor Gimp. The process is described here: “GIMP – Creating a Contrast Mask“.
EDIT: See below for a Lightroom corrected image.
Final image:
This is the best picture I got using this technique. Here is the full scale image. Feel free to comment below!
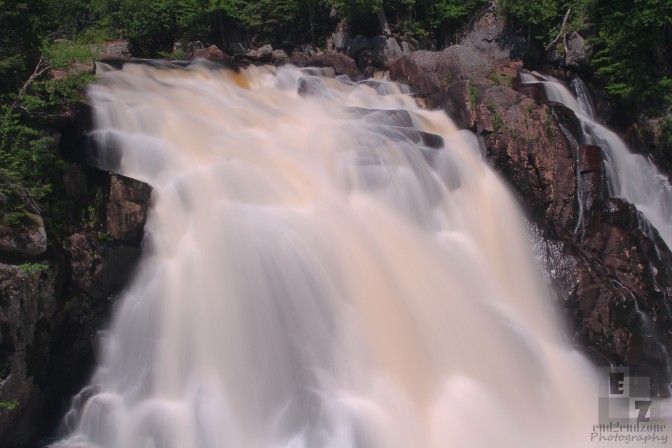
Chute du Diable
EDIT: And here is a Lightroom corrected version I made:
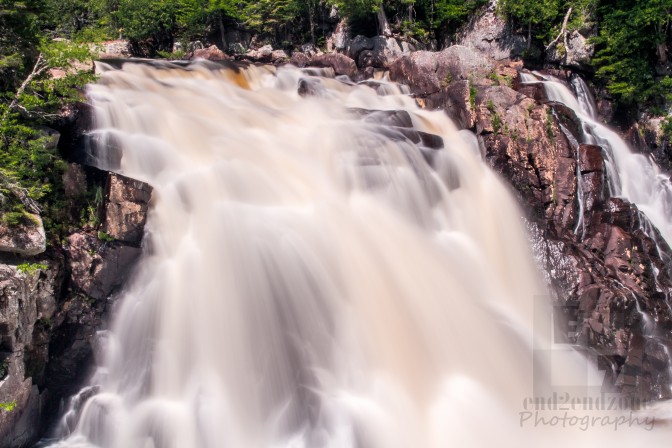
Chute du Diable
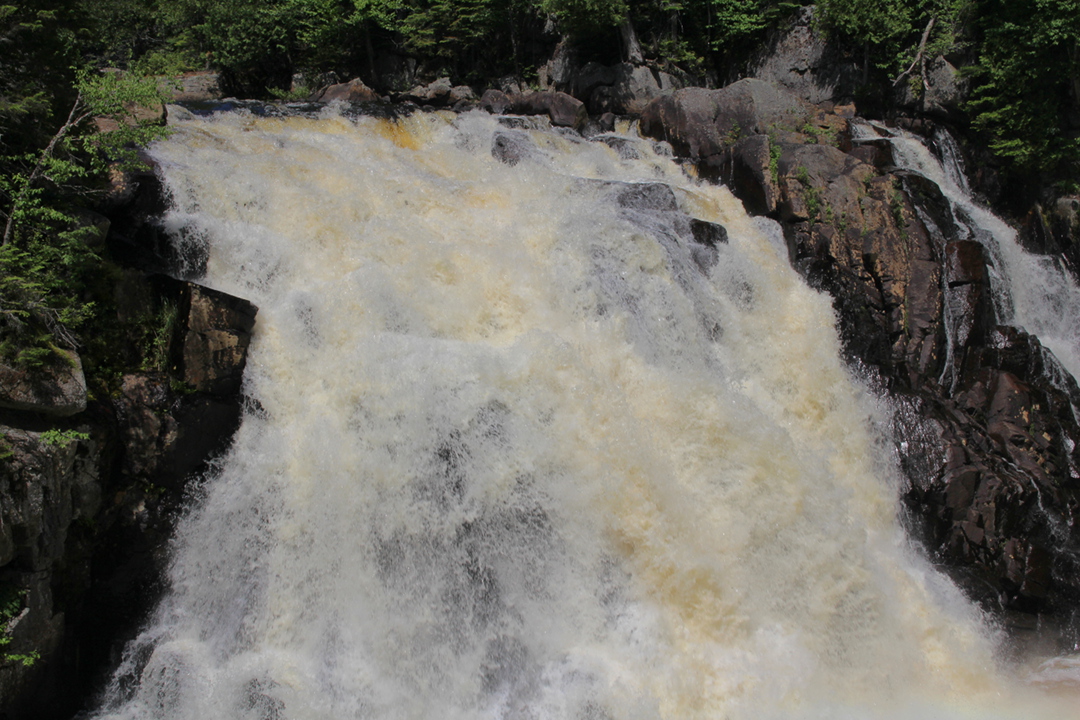
In contrast, here is a static image of the same waterfall with motion freeze on automatic settings.
What I would change for next time ?
Find the perfect time of the day
Went I shot this waterfall, I had to get there at noon. During this time of the day, the light is too bright and the water is reflecting too much light compared to the vegetation and trees around the waterfall. With this setup, you must use ND filters and you may need to correct the contrast between the vegetation and the waterfall in post processing as explained earlier.
The perfect time of the day to get a nice shot is to go soon after sunrise or a little before sunset. These are the best time because the light is even for both the waterfall and the surrounding. You may also realize that you may not need ND filters and be able to correct the exposure just by managing a narrower aperture.
Another good time of the day would be during “Grey days”. When there is enough clouds in the sky to create a constant diffuse light. That kind of lighting would be better than bright sunny days at noon!
Better composition
When I was on site, I was overwhelmed by the waterfall and all the noise and the mist it was making. I completely forgot to manage to properly frame the waterfall in it’s context. I picture with more vegetation and showing the trees around it would have better showed the waterfall in it’s context and would have made a better picture.