Introduction
Time-lapse photography is a wonderful effect to make your images alive instead of static because you can make a plain (or almost boring) event and make it so much more dramatic. However, it is something that usually needs a lot of time investment to get something acceptable.
Considering my family was planning to decorate the Christmas tree during the weekend, I decided to take my camera and capture the whole event in a time-lapse video.
To get a nice video, you need to prepare yourself before taking the shots because if you don’t, you can end up with a bad picture set and have a hard time merging all pictures together.
The following article will explains how I managed to make a nice time-lapse video with a DSLR using only free software.
Click here to jump to the Final Results section and see the video.
Prepare you gears
Mandatory gears for time-lapse videos
Tripod
This one is obvious. You need a tripod to make sure that all images are aligned the same directions. The field of view must be identical for all captured images. You do not want to see the background of the event moving during the video but only your subject.
Intervalometer
An intervalometer is a remote trigger with the added capacity to trigger the camera shutter at regular intervals. It is mandatory if you want to do time-lapse image capturing. It is not used to reduce camera shake since the photographer does not take any actions on the camera during the capturing process.
Useful stuff
Calculator
A calculator is useful if you go out in the field for your capturing session. For most time-lapse projects related to capturing the nature, it would be wise to bring a camera with you for calculating the perfect interval for your desired effect. See the section Calculating the best interval for details.
Tools you won’t need
Flashes
If you think you may need a flash for taking your shots, you might have to reconsider your project.
If your intervals are too short (the elapsed time between each photos), the flash might not have the time to recharge between each shots.
If your intervals are long enough to have your flash recharged, it means that the subject could be positioned differently in the scene resulting in great highlight changes which is really hard to correct in post-production.
Another issue that the flash might cause is flickering. If your scene is not well lighted, there is a high chance that you end up with lots of flickering during the merging phase. The exposition will vary a lot between each shots and that would not be pleasant to watch. Some plugins can help to reduce flickering but it is always better to think about this in pre-production than dealing with it in post-production.
I am unable to think of a suitable scenario where a flash would be required that also requires long intervals like 5 minutes or more.
Check your calculations
Don’t go out and try to shot anything as quickly as possible. I recommend that you take the time to think and evaluate what is the best interval (time between each photos) for your needs. Is it going to be seconds, minutes or even hours between each shots ? That would greatly change how you need to prepare yourself.
Smooth or hard movement transitions?
Smooth transitions
Smooth transitions between each photos means a short interval between each capture. Is is used when you want your subject to move slowly or show few changes between each frame so the user can understand the subject movement over time.
A high frame rate (at least 24 fps, 30 fps is best) in the final video is required for smooth transitions.
If you make your calculations for a video that is too smooth, the subject will appear frozen which is not something that we want on a time-lapse video.
Usual examples are melting ice, clouds or sunsets/sunrise, or mostly any kind or subject movement.
Hard transitions
As opposed to smooth transitions, hard transitions between each photos means a longer time interval between each capture. It is used in situation where the user do not have to follow movement like when you want to show the different steps or the increasing progress of a project.
A low frame rate (between 1 fps to 15 fps) in the final video would result to a final video with hard transitions.
If you make your calculations for a video with too hard transitions, the viewer could get confused about what just happened since frames have a tendency to “jump” from one to another.
Usual examples are building constructions or rotting fruits.
Calculating the best interval
Once you have defined what kind of transitions you want, and the “amount” of movement you want to show in your final video, here’s how to perfectly define the right interval time to get very smooth or hard transitions.
You first need to define the following:
- How long does the real event last ?
- How long the final video would be ?
- What is the final video frame rate ? That is 15 or less for hard and 24 and over for smooth.
Now open Photography time-lapse calculator (that’s an Excel sheet) and take a look at the “interval calculator”. Use the same number in the appropriate fields and the sheet will do the math to give you the perfect interval time for the desired smooth/hard transition effect.
Gear setup
Use manual focus
Set your camera in manual focus. This is also mandatory if your intervals are really close (less than 10 seconds).
If you set your camera in auto focus, lets say to capture the movement of your subject when it moves closer and away from the camera, you will end up with some pictures with a blurry background and some with a clear background and that would not be interesting to watch.
Also, the auto-focus of your camera can take as much as 1-2 seconds and that delay would be added to the intervals between each shots. You are much better to use a narrower aperture to increase the dept of field instead of using auto-focus.
It also saves battery power 🙂
Set camera in manual mode
You need to set your camera in manual mode.
The objective is to have an identical exposure over all your frames (pictures) during the whole capturing period. The only way to expect this is to use the manual mode in your DSLR. All other modes will make assumptions or estimation of what is the best value for ISO/Aperture/Shutter speed and you may not always get the same value which would create slight variations in the final image exposure.
The same applies for any priority modes.
Shutter speeds
almost any shutter speed is good for doing time-lapse videos. However, make sure you select a shutter speed that is appropriate for the situation. If your shutter speed that is too fast/quick, all your images will appear frozen which would result in a consecutive list of frozen action images.
If your final video have a medium to low frame rate, you could make use of this by selecting a slow shutter speed (read 1/60th to 1/30th). That shutter speed range would create motion blur in your image and ease the transition between 2 video frames.
Aperture
Set your aperture as wide as possible (that means the lowest f number as possible) to allows a maximum amount of light to enter the camera. Take consideration for allowing a proper depth of field for your video.
If your subject is close to the camera, a wider depth of field is required (to have both the background and the subject at focus) so a narrow aperture (high f number) would be better.
If you are capturing a background or a nature scene, the widest aperture would allow more light to come in without sacrificing anything at focus.
ISO
As usual, set your ISO to the lowest possible value that is reasonable for giving the right exposure.
Shoot in JPG
Set your camera to shoot in JPG not RAW. RAW is really nice for stills but it is way too heavy for multiple captures and considerably reduces your recording time. Besides, you don’t really need RAW for time-lapse videos.
An average RAW file takes about 26.75 MiB and considering you may be capturing stills at 15 seconds intervals, you will only be able to record 570 frames. In other words, you will only be able to record an event of 2 hours and 22 minutes before fulling the memory card. If you are capturing at 10 seconds interval, that’s only 1 hour and 35 minutes of real-time recording before fulling the memory card!
Here’s the calculations:
16 GB = 16000000000 bytes = 15258 MiB
15258 MiB / 26.75 MiB per photo = 570 frames
570 photos @ 1 frame per 15 seconds = 142.5 minutes = 02:22:30 of real-time recording.
570 photos @ 1 frame per 10 seconds = 95 minutes = 01:35:30 of real-time recording.
During this shooting, I use RAW captures without thinking much about this. I had to invest too much time converting and resizing images to JPG. I also had to change the 16 GB memory card for another one at the end of the video which explains why the view angle changes at the end. Save yourself the trouble and use the JPG captures.
Set reduced image capture size
This step is optional but doing so could reduce the amount of time in post-processing. If you already know the resolution of the final video (480p, 720p, 1080p, 4K), you can set the camera to automatically resize images to the appropriate resolution that matches the final video resolution.
You can also decide to skip this step and reduce images size during post-processing with your favorite image editor with the help of a batch plugin or use a live resize filter when importing images into the video software.
Turn off Image stabilization (IS)
As usual, since you are using a tripod, set Image Stabilization to off.
Configure appropriate white balance
Turn off auto white balance. This is required to reduce flickering to a minimum. It is better to have flickering because the amount of light in the room was varying over time than having your camera trying to detect the best white balance on every capture. Try on auto once, look at the value and use the same for all other captures.
In other words, it is best to set all auto features of your camera to off for the same reasons.
Connect your intervalometer
Connect your intervalometer and configure the appropriate interval time calculated previously for capturing frames.
Capture your scene
Now is the time to take as much shoot as needed for properly capturing your subject’s movement or change over time. In the meantime, get yourself a coffee, start downloading required softwares or watch a movie and come back in a hour or so 🙂
Prepare your image files
After the capturing session is completed and you have transferred all your images to your PC, it is time to make sure your files are prepared for the final product.
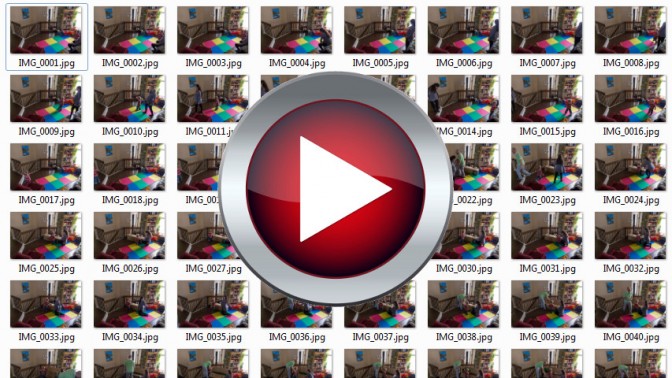
Verify the image sequence order
In order to import the images to a video application, all images must have the same pattern: a common prefix with a sequential increasing number. All images have to be named in a continuous image sequence. However, in some scenarios, this list could be broken or require modifications.
Here’s some situation that might happened which would require special attention.
Reordering, fixing image counter wrap around
In the low probability that you started shooting pictures when your camera’s file name counter was close to wrapping around (say IMG_9xxx.jpg), you might end up with a broken sequence. That means you will have your first block which is IMG_9000.jpg to IMG_9999.jpg and your second block which is IMG_0000.jpg to IMG_2345.jpg. Most (if not all) video software will try to import each block as independent blocks. To prevent this, you need to reorder your images to a single continuous image sequence.
In other words, you basically need to reorder each block to the following:
- IMG_0000.jpg […] IMG_2345.jpg renamed to IMG_1000.jpg […] IMG_3345.jpg
- IMG_9000.jpg […] IMG_9999.jpg renamed to IMG_0000.jpg […] IMG_0999.jpg
to get the target range IMG_0000.jpg […] IMG_3345.jpg.
The easiest way to do this is to use the following script. Copy and paste the content of the following window and create a file located next to the images called “rename.vbs”.
Take note that the .vbs file extension is mandatory for Windows to recognize the file as a runnable script.
|
1 2 3 4 5 6 7 8 9 10 11 12 13 14 15 16 17 18 19 20 21 22 23 24 25 26 27 28 29 30 31 32 33 34 35 36 37 38 39 40 41 42 43 44 45 46 47 48 49 50 51 52 53 54 55 56 57 58 59 60 61 62 63 64 65 66 67 68 69 70 71 72 73 74 75 76 77 78 79 80 81 82 83 84 85 86 87 88 89 90 91 92 93 94 95 96 97 98 99 100 101 102 103 104 105 106 107 108 109 110 111 112 113 114 115 116 117 118 119 120 121 122 123 124 125 126 127 128 129 130 131 |
defaultCaption = "Enter a value" prefix = askString(defaultCaption, "What is the prefix filename for your images?", "IMG_") postfix = ".jpg" block1Start = askNumber(defaultCaption, "What is the starting number for the first block?", 9000) block1End = askNumber(defaultCaption, "What is the ending number for the first block?", 9999) block2Start = askNumber(defaultCaption, "What is the starting number for the second block?", 0) block2End = askNumber(defaultCaption, "What is the ending number for the second block?", 2345) indexLength = Max(Len(block1Start), Max(Len(block1End), Max(Len(block2Start), Len(block2End) ) ) ) block1Size = block1End-block1Start+1 block2Size = block2End-block2Start+1 block1ImageStart = prefix & padNumber(block1Start, indexLength) & postfix block1ImageEnd = prefix & padNumber(block1End, indexLength) & postfix block2ImageStart = prefix & padNumber(block2Start, indexLength) & postfix block2ImageEnd = prefix & padNumber(block2End, indexLength) & postfix '0 to 3345 newBlock1IndexStart = 0 newBlock1IndexEnd = block1Size newBlock2IndexStart = block1Size+1 newBlock2IndexEnd = block1Size+block2Size newBlock1ImageStart = prefix & padNumber(newBlock1IndexStart, indexLength) & postfix newBlock1ImageEnd = prefix & padNumber(newBlock1IndexEnd, indexLength) & postfix newBlock2ImageStart = prefix & padNumber(newBlock2IndexStart, indexLength) & postfix newBlock2ImageEnd = prefix & padNumber(newBlock2IndexEnd, indexLength) & postfix confirmationMessage = "The following script will rename block " & vbCrLf & _ block1ImageStart & "-->" & block1ImageEnd & _ " into " & _ newBlock1ImageStart & "-->" & newBlock1ImageEnd & vbCrLf & _ "and block " & vbCrLf & _ block2ImageStart & "-->" & block2ImageEnd & _ " into " & _ newBlock2ImageStart & "-->" & newBlock2ImageEnd & vbCrLf & _ vbCrLf & _ "Is this what you want?" defaultCaption = "Confirm renaming" askYesOrDie defaultCaption, confirmationMessage askYesOrDie defaultCaption, "The process is permanent and can not be undone." & vbCrLf & "Are you really sure?" 'start with file renaming 'Renaming all files with a "tmp_" prefix to prevent conflicts for i = block1Start to block1End oldFilename = prefix & padNumber(i, indexLength) & postfix newFilename = "tmp_" & oldFilename renameFile oldFilename, newFilename next for i = block2Start to block2End oldFilename = prefix & padNumber(i, indexLength) & postfix newFilename = "tmp_" & oldFilename renameFile oldFilename, newFilename next 'Rename tmp_block1 loopCount = 0 for i = block1Start to block1End oldFilename = "tmp_" & prefix & padNumber(i, indexLength) & postfix newFilename = prefix & padNumber(loopCount+newBlock1IndexStart, indexLength) & postfix renameFile oldFilename, newFilename loopCount = loopCount + 1 next 'Rename tmp_block2 loopCount = 0 for i = block2Start to block2End oldFilename = "tmp_" & prefix & padNumber(i, indexLength) & postfix newFilename = prefix & padNumber(loopCount+newBlock2IndexStart, indexLength) & postfix renameFile oldFilename, newFilename loopCount = loopCount + 1 next sub renameFile(oldFilename, newFilename) Dim fso Set fso = WScript.CreateObject("Scripting.FileSystemObject") fso.MoveFile oldFilename, newFilename Set fso = nothing end sub sub askYesOrDie(caption, prompt) response = Msgbox(prompt, vbYesNo+vbExclamation, caption) if (response = vbNo) Then WScript.Quit 'Detect No end sub function askNumber(caption, prompt, defaultValue) Dim response Do response = InputBox(prompt, caption, defaultValue) If response = "" Then WScript.Quit 'Detect Cancel If IsNumeric(response) Then Exit Do 'Detect value response. MsgBox "You must enter a numeric value.", 48, "Invalid Entry" Loop askNumber = response end function function askString(caption, prompt, defaultValue) Dim response Do response = InputBox(prompt, caption, defaultValue) If response = "" Then WScript.Quit 'Detect Cancel Exit Do 'Detect value response. Loop askString = response end function function Max(a,b) Max = a If b > a then Max = b end function function Min(a,b) Min = a If b < a then Min = b end function function padNumber(value, numDigits) value2 = value do while(len(value2) < numDigits) value2 = "0" & value2 loop padNumber = value2 end function |
Note: This script is only available for the Windows platform.
Deleting erroneous images
If you see an erroneous image or an image that would break the flow of movement, you may have to delete an image from the sequence. Let say that during the capturing session, you had to check your camera and accidentally moved your hand in front of the lens. IMG_3400.jpg is now a nice black picture of your hand…
If you ever have to delete an image, you need to restore the natural sequence order for the video software to recognize the whole sequence. For every image deleted, you need to copy & paste the previous image and rename it using the name of the deleted image.
In the previous example, if you want to delete IMG_3400.jpg, you first delete IMG_3400.jpg, then copy IMG_3399.jpg and name it IMG_3400.jpg.
If you want to delete multiple frames, lets say IMG_3050.jpg to IMG_3069.jpg (20 frames), it is best to restore the sequence using both IMG_3049.jpg and IMG_3070.jpg to create a smaller hole/gap. That is deleting IMG_3050.jpg through IMG_3059.jpg and using IMG_3049.jpg for restoration of the first half and deleting IMG_3060.jpg through IMG_3069.jpg and using IMG_3070.jpg for restoration of the second half.
Please take note that deleting pictures actually creates an artificial hole/gap in the final video timeline and may result to a hard transition.
Resize your images
This step is optional but it is suggested to resize your images to help Windows Movie Maker or VirtualDub to load all images into your project. It is a good idea to resize all your images to match the final resolution of your movie (that is 720p or 1080p pixels high).
The best way to resize your images is to use David’s Batch Processor 1.1.8 plugin for Gimp and follow theses steps:
- Open Gimp.
- Click on Filters\Batch Process… menu to launch David’s Batch Processor.
- Import your images into David’s Batch Processor:
- In the Input tab, click the Add Files button and browse to your images location.
ie G:\Temp\timelapse\noel2014 - Select all your images and press the Add button. That will import all your images. This process may take some time. Please be patient.
- Once completed, press the Close button to close the file dialog.
- In the Input tab, click the Add Files button and browse to your images location.
- Enable Resizing for all your images
- Click on the Resize tab.
- Check the Enable check box.
- Select the Absolute option. That will enable the second section.
- Enter the final resolution of your movie.
- Use a Width of 1280 and a Height of 720 for a 720p resolution or
- Use a Width of 1920 and a Height of 1080 for a 1080p resolution.
- Select Inside for the Fit property.
- Define where your resized images will be saved
- Click on the Rename tab.
- Click on Select Dir button and select a new output folder.
ie: G:\Temp\timelapse\noel2014Resize - Once completed, press the Open button to close the folder dialog.
- You should see your target folder listed next to the field To Directory.
- Define the image format of the resized images
- Click on the Output tab.
- Select the following values for each fields:
- Format: JPG
- Quality: 0.85
- Smoothing: 0.00
- Optimize: checked.
- Progressive: unchecked.
- Sampling: 2×2
- Baseline: checked.
- Restarts: 0
- Algorithm: Integer
- Press the Start button to start resizing your images.
- Wait for the process to complete.
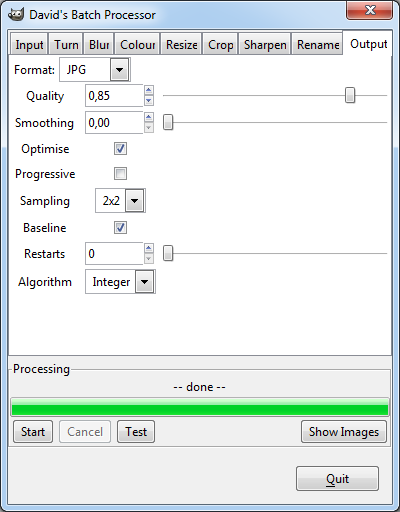
David Batch Processor Done
Combining photos into a movie
In the next sections, I will explain 2 methods that you can use to combine photos into a movie. Each methods has their own required list of software and has their pros and cons.
Windows Movie Maker
This sections explains how to process your captured images into a video using Windows Movie Maker.
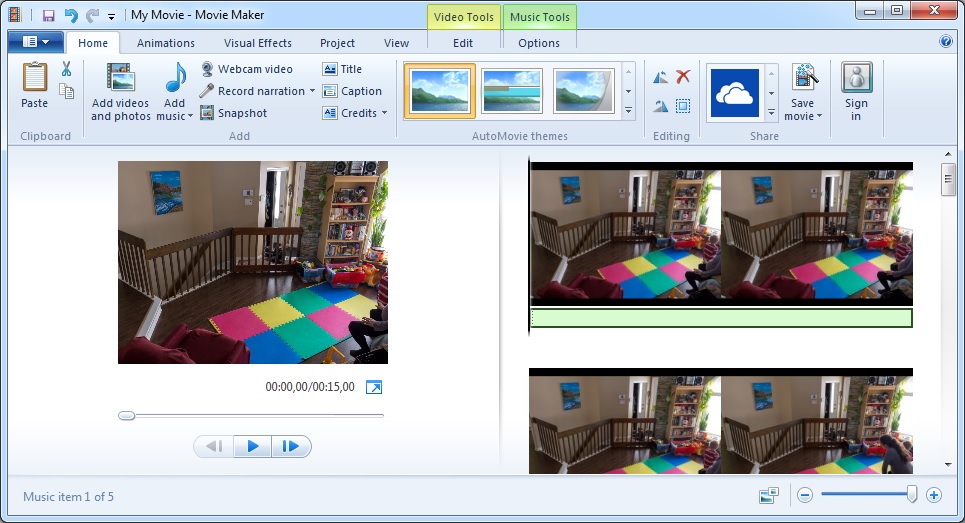
Windows Movie Maker screenshot
Download required files
- Windows Movie Maker online installer / offline installer download.
- or the older version Windows Movie Maker 2.6.
Download and install each software before processing to the next steps.
Add photos to movie timeline
All your images are ready. Now is the time to import them in Windows Movie Maker by following theses steps:
- Open Windows Movie Maker.
- Importing all images
- Press the Add videos and photos button.
- Select all your images and press the Open button.
- Set the appropriate frame rate
- Right-click on the timeline and select the option Select All.
- Press Ctrl+A key to select all.
- Click on the Edit tab.
- Locate the Duration field. That is the time in seconds where the frame will remain visible.
- Based on the calculation you made in section Calculating the best interval, set the appropriate duration to match your desired frame rate with the following formula:
Duration = 1 / fps.- Here are quick calculations:1 fps = 1 second
2 fps = 0,5 second
10 fps = 0,1 second
15 fps = 0,066666667 second
16 fps = 0,0625 second
20 fps = 0,05 second
24 fps = 0,041666667 second
30 fps = 0,033333333 second
- Here are quick calculations:1 fps = 1 second
Adding an audio track
Windows Movie Maker supports adding an audio track to the video. You can use an audio file or the audio of another video as an audio track. To add an audio track, follow theses steps:
- Left-click on the timeline and move the cursor to the beginning of the timeline.
- Click on Add Music button in the ribbon toolbar.
- Browse the audio or video file and click on Open button.
- You should see a new track with a green background on the timeline view.
If you do not have an audio file on your computer, you can try to find some on the Creative Commons Search (Music) site.
Saving to MP4 file
Now that your composition is complete, save your project into an MP4 video by following theses steps:
- Click on Save Movie button in the ribbon toolbar.
- Select the export settings that matches your needs and file size. For maximum quality, save your movie using the For high-definition display setting.

Windows Movie Maker Export Completed
VirtualDub
This sections explains how to process your captured images into a video using VirtualDub.
Download required files
- VirtualDub (latest version).
- Lagarith Lossless Video Codec
- VirtualDub MSU Deflicker filter or Deflicker Filter for VirtualDub
- HandBrake
- FadeFX 1.2 – Fade Effects for VirtualDub
Download and install each software before processing to the next steps.
Importing
Importing your images as a video in VirtualDub is also really easy: simply follow theses steps:
- Start VirtualDub.
- Click on File/Open video file menu.
- In the Open file dialog, make sure that Automatically load linked segments is checked.
- Select the first image of the sequence and click the Open button. VirtualDub will automatically detect the next images and will update the timeline accordingly.
- Verify that the timeline length (in video frames) matches the total number of captured images in your project.
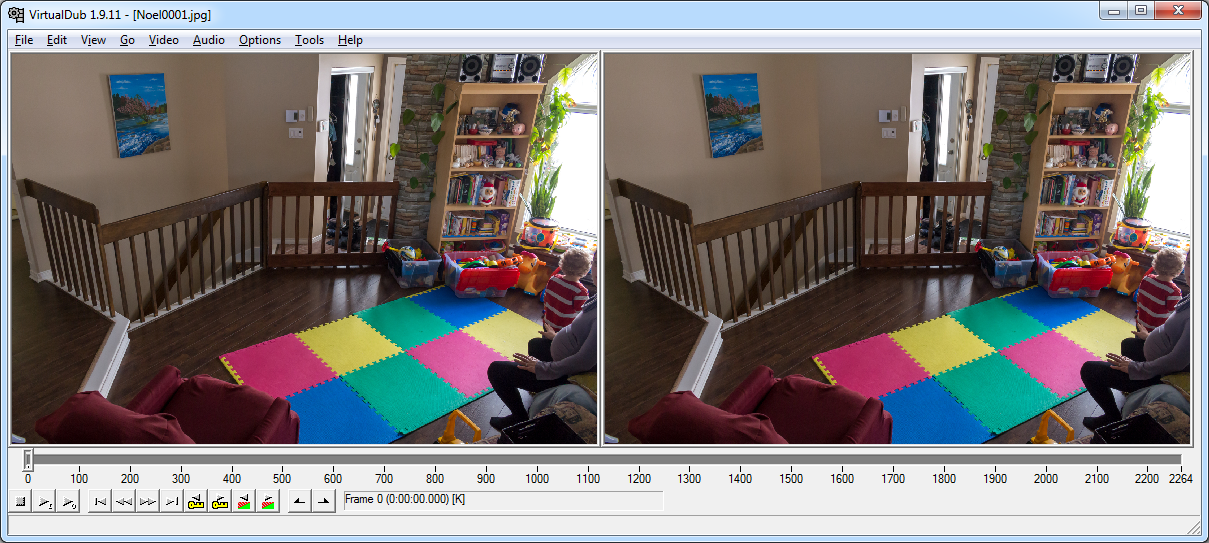
VirtualDub editing
Configure Frame Rate
- Click on Video/Frame Rate menu. That will open the Video frame rate control dialog.
- Select Change frame rate to (fps) and enter the value you calculated in section Calculating the best interval.
Lossless video codec
VirtualDub output uncompressed AVI files by default which is not an option considering the resolution of the video. It needs to be configured to use a video codec for compressing the video.
Since this guide will handle re-encoding using Handbrake, it is suggested to use a lossless video codec to prevent loosing any quality while exporting your video from VirtualDub to Handbrake. The best lossless video codec available is Lagarith Lossless Video Codec.
Here are the steps for configuring the codec:
- Click on Video/Compression menu. That will open the Select video compression dialog.
- Select Lagarith Lossless Codec and press the Configure button.
- Check Use Multithreading and Prevent Upsampling When Decoding.
Reducing flickering
Flickering occurs when the exposition between each video frame is not identical which gives the fading effect that you may see. That is why your should shoot in manual: to reduce flickering to a minimum.
If you see flickering in your video, a filter can be applied to the video to reduce it. Here are the steps for configuring the filter:
- Click on Video/Filters menu. That will open the Filter dialog.
- Click on the Add button. That will open the Add Filter dialog.
- Click on the Load button and browse to the location where you extracted one of the deflicker filter (*.vdf)
- Press the OK Button.
- Configure the filter parameters and press the OK button.
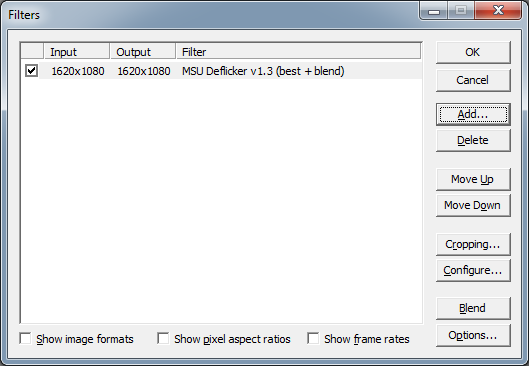
VirtualDub Deflicker filter
Applying additional filters (optional)
If you want to add fade-in or fade-off effects you can use the FadeFX filter with the following:
- Click on Video/Filters menu. That will open the Filter dialog.
- Click on the Add button. That will open the Add Filter dialog.
- Click on the Load button and browse to the location where you extracted one of the fadefx filter (*.vdf)
- Press the OK Button.
- Configure the filter parameters and press the OK button.
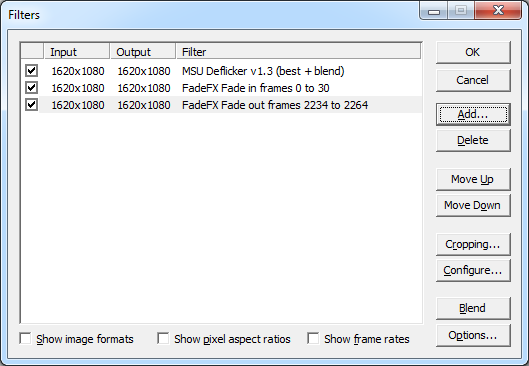
VirtualDub Fade In Fade Out filter
Adding an audio track
VirtualDub also support adding an audio track from an external audio file. VirtualDub works best with WAV of MP3 audio file. Here are the steps for adding an audio file to your video:
- Click on Audio/Audio from other file menu. That will open the Open an audio file dialog.
- Browse to the location of the audio file add and click the Open button.
- If you are importing an MP3 file, select the type of bitrate of the file. That is CBR or VBR. In case you do not know, select Autodetect.
- Press the OK Button.
For free creative commons licensed music, visit the following link: Creative Commons Search (Music).
Saving to temporary *.avi file
As explained in the Lossless video codec section, VirtualDub is not the best software for encoding your video (compressing). It is better to use Handbrake for this task. To save your video without loosing any detail or data, a temporary AVI file must be created.
- Click on File/Save as AVI menu. That will open the Save file dialog.
- Browse to the location where you want to save your video and enter a filename for saving. Click the Save button.
- Wait for the encoding to complete.
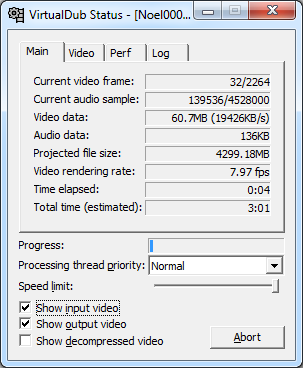
VirtualDub encoding
Re-encoding using Handbrake
Handbrake is the best video encoder to use for compressing your video because it supports constant quality encoding parameters. Here are the steps for compressing your video:
- Click on Source icon in the toolbar and select File. That will open the Open file dialog.
- Browse to the location of the temporary video (*.avi) you created in the previous step. Click the Open button.
- Click on the Browse button. That will open the Save file dialog.
- Browse to the location where you want to save your final video and enter a filename for saving. Click the Save button.
- Click on the Picture tab.
- Select the following values for each fields:
- Anamorphic: Strict
- Cropping: Custom
- Top, Bottom, Left, Right: 0
- Click on the Video tab.
- Select the following values for each fields:
- Video codec: H.264 (x264)
- x264 Preset: Slow
- x264 Tune: None
- Quality, Constant Quality: RF 22
- Click on the Audio tab.
- Select Auto Passthru for Codec.
- Click on the Start icon in the toolbar.
- Wait for the encoding to complete.
Final results
The shots for this time-lapse were taken with my 18-55mm kit lens at 18mm, f/8.0, 1/30th shutter speed, ISO 1600 and 2 seconds between each shots. I accidentally left auto white balance turned on, which is what gives it that flicker.
The real-time event lasted for 1 hour and 16 minutes. A total of 2264 photos was required.
Here is the final result video visualized at 30 frames per seconds: